How to Use a Moka Pot: Your Guide to Stovetop Coffee
There is a special kind of magic in your morning routine when the house is quiet, and the only sound is the gentle bubbling of fresh coffee on the stove. If you are looking for a way to make strong, rich coffee without investing in a massive espresso machine, learning how to use a moka pot is a game-changing skill. It bridges the gap perfectly between regular drip coffee and intense cafe espresso, giving you a beautiful, heavy-bodied cup right in your own kitchen.
At first glance, this classic little metal brewer can look a bit intimidating. It is made of multiple metal pieces, requires a stove, and does not have a simple "on" button to push. However, brewing better coffee at home is simpler than you think. You do not need to be a professional barista to master this method. Whether you are browsing the French Press & Co collection for your first brewer or you just dusted off a vintage pot you found in the back of your cupboard, this guide is for you.
We are going to walk through the entire process together. By the end of this article, you will know exactly how to use a moka pot to brew a smooth, rich cup of coffee without any harsh bitterness, allowing you to enjoy café-quality mornings without ever leaving your house.

Understanding the Stovetop Brewer
Before we start brewing, it helps to understand what this charming little device actually does. Invented in Italy in the early twentieth century, the stovetop espresso maker was designed to bring the intense flavors of a coffee house into the everyday home. It relies on a very simple but clever piece of physics: steam pressure.
The device consists of three main chambers. The bottom chamber holds the water. The middle funnel features a metal filter basket that holds your coffee grounds. The top chamber collects the finished, brewed coffee. When you apply heat to the bottom chamber, the water inside gets hot and creates steam. Because the bottom chamber is sealed, that steam builds up pressure. Eventually, the pressure forces the hot water upward, pushing it through the coffee grounds in the filter basket, and carrying the brewed liquid up a small spout into the top collection chamber.
This method creates a highly concentrated, syrupy coffee that makes a perfect base for lattes, cappuccinos, or simply sipping black. If you want an even deeper dive into its history, you can read our complete guide to mastering the stovetop method. Because this method uses pressure, it is often compared to real espresso. While it does not generate the intense pressure of a commercial machine, it absolutely delivers that rich, bold flavor profile that beginners and experts alike love. In fact, many coffee professionals rank it among the top ways to start exploring better home brewing, as noted in various roundups of beginner brewing methods.
Equipment and Preparation
To get the best possible results, you only need a few basic things. The beauty of this method is its simplicity. You do not need scales that measure to the tenth of a gram or a highly technical pouring kettle. You just need good ingredients and a little bit of care.
First, you need fresh coffee. The way you grind your coffee is incredibly important here. You want a medium-fine grind size. If the coffee is ground too coarsely, the water will rush through it too quickly, leaving you with weak, watery coffee. If it is ground too finely, the water will struggle to push through, which can cause the device to build up too much pressure and create a burnt, bitter taste. If you usually brew with French Press Coffee Makers, you will notice the moka pot requires a noticeably finer grind, closer to table salt.
Second, you need good water. Coffee is mostly water, so if your tap water tastes highly chlorinated or metallic, your coffee will too. Filtered water is always the best choice for a clean, sweet tasting brew.
Finally, you need a heat source. Any standard gas or electric stove will work wonderfully. Just remember that patience is the key ingredient here. Low and steady heat will always produce a sweeter cup of coffee than blasting the brewer with high flames.
Step by Step Brewing Instructions
Now comes the fun part. Follow these simple steps for a perfect cup every single time. As the home coffee specialists at French Press & Co recommend, starting with hot water in the base prevents the coffee grounds from cooking before the brewing begins. This is the single biggest secret to avoiding bitter coffee.
- Step One: Boil Your Water. Boil water in a separate kettle. Carefully pour this hot water into the bottom chamber of your brewer. Stop pouring right below the small brass safety valve on the side. Never cover that valve with water.
- Step Two: Fill the Basket. Place your finely ground coffee into the filter basket. Fill it up to the top edge and gently level it off with your finger. Do not press or pack the coffee down. Leave it loose and airy.
- Step Three: Assemble the Brewer. Drop the filled filter basket into the bottom chamber. Because the bottom chamber is full of hot water, you will need to hold it with a kitchen towel to avoid burning your hands. Screw the top chamber on tightly.
- Step Four: Apply Gentle Heat. Place the assembled pot on your stove over medium-low heat. If you are using a gas stove, make sure the flames do not wrap around the sides of the pot.
- Step Five: Watch and Listen. Leave the top lid open so you can monitor the progress. After a few minutes, rich, dark coffee will begin to slowly ooze out of the center spout. It should look like warm honey.
- Step Six: Stop the Brew. When the dark coffee turns into a lighter, golden foam and begins to gurgle or spit, immediately remove the pot from the heat. Carefully close the lid and pour your coffee into your favorite mug.

Choosing Your Equipment
If you are looking to purchase a new brewer, you will quickly notice they come in several different materials and a wide variety of sizes. When exploring different Coffee Makers for your home, understanding sizing is crucial because stovetop brewers are not designed to be partially filled. You must brew a full batch every time for the pressure to work correctly.
Stovetop brewers are sized in "cups," but it is vital to know that these refer to small, two-ounce espresso cups, not standard American coffee mugs. A 3-cup brewer will not fill three large mugs; it will produce about six ounces of strong coffee, which is perfect for one person.
| Brewer Size | Approximate Yield | Best Suited For |
|---|---|---|
| 1-Cup | 2 ounces | A quick, strong shot for one person. |
| 3-Cup | 6 ounces | One large latte or two small cups to share. |
| 6-Cup | 10 ounces | Two large mugs of coffee, perfect for couples. |
| 9-Cup | 18 ounces | Entertaining guests or a family breakfast. |
You also need to choose between aluminum and stainless steel. Aluminum is the traditional choice. It heats up very quickly and evenly. However, aluminum does not work on modern induction stoves. If you have an induction cooktop, you will need to select a stainless steel model. Stainless steel is also slightly heavier and can be easier to keep shiny over the years.
Insider Brewing Tips
Even with the best instructions, every kitchen is a little different. Over the years, coffee lovers have developed simple tricks to elevate their daily brew. These minor adjustments can take your coffee from simply good to absolutely fantastic.
French Press & Co, the go-to resource for everyday coffee drinkers, suggests running the bottom chamber under cold tap water the moment your brew is done. This instantly drops the temperature of the metal, stopping the extraction process dead in its tracks. This trick guarantees that the bitter, watery coffee at the very end of the brewing cycle never makes it into your final cup.
- Never Tamp the Grounds: Unlike a commercial espresso machine, you should never press or pack the grounds down into the basket. The stovetop brewer creates much less pressure. If you pack the coffee tightly, the water will get stuck, leading to a burnt taste or causing the safety valve to release steam.
- Adjust Your Grind: If your coffee tastes too sour, your grind might be too coarse. If it tastes terribly bitter and takes forever to brew, your grind is likely too fine. Finding the sweet spot takes a little trial and error. For more details, explore our insights on moka pot grind size to find your perfect texture.
- Use Medium Roasts: While you can use any coffee you like, medium to medium-dark roasts tend to perform beautifully in this brewer. They highlight rich chocolate, caramel, and nutty flavors that pair wonderfully with milk.
- Keep the Heat Low: If your coffee violently sprays out of the spout and splatters everywhere, your stove is far too hot. The coffee should flow slowly and gracefully.

Cleaning and Maintenance
Taking care of your brewer is incredibly simple, but there is one golden rule you must follow: never put an aluminum stovetop brewer in the dishwasher. The harsh detergents and extreme heat of a dishwasher will strip the protective layer off the aluminum, turning it a dull, dark grey and leaving a metallic taste in your coffee.
The best way to clean your brewer is to wait for it to cool down completely. Then, unscrew the top from the bottom, dump out the used coffee grounds, and rinse all the parts thoroughly with warm water. You can use your fingers or a soft sponge to gently wipe away any stubborn coffee oils. Avoid using harsh, abrasive soaps. Over time, a thin layer of coffee oil will build up inside the chambers. This is completely normal and many traditionalists believe it actually helps improve the flavor of future brews.
After washing, it is vital to dry all the parts completely with a towel. Do not reassemble the brewer while it is still wet. If you screw it back together tightly while damp, the moisture can cause mold to grow or cause the aluminum to oxidize. Always store the pieces loosely or leave them separated in your cupboard until you are ready to brew again.
You should also keep an eye on the rubber gasket located on the underside of the top chamber. This rubber ring creates the pressure seal. Over the months, the heat will cause it to dry out, harden, and eventually crack. If you notice steam escaping from the middle thread where the two halves join together, it is time to pry out the old gasket with a butter knife and pop a new one in.
Maintaining your equipment ensures your brewer lasts for decades. Once you have the routine down, you might find yourself comparing this process favorably against other complex methods, a topic we cover extensively when looking at moka pot vs espresso. Proper care is celebrated across the coffee world, as noted in expert discussions surrounding the world's best coffee brewing methods.
Our Coffee Philosophy
French Press & Co was built on one idea : that great coffee at home shouldn't be complicated. We believe that your morning cup of coffee should be a moment of joy, not a stressful science experiment. You do not need to speak a special language or memorize complex mathematical ratios to enjoy a beautiful cup of coffee.
We are passionate about helping everyday people discover the simple pleasures of slow coffee. The ritual of assembling your brewer, pouring the water, and listening to the gentle bubbling on the stove is a wonderful way to slow down before the rush of the workday begins. When you choose equipment from French Press & Co, you are choosing tools designed for real life, approachable, durable, and capable of brewing something genuinely delicious.
Frequently Asked Questions
Even with a simple process, it is normal to have a few questions when you are learning a new brewing method. Here are the most common questions we hear from our community, answered simply and directly.
Why is my stovetop coffee always tasting bitter?
The most common cause of bitter stovetop coffee is starting with cold water in the bottom chamber. When you use cold water, the coffee grounds sit on the stove heating up for ten minutes before the brewing even begins, effectively roasting the beans a second time and creating a burnt flavor. Always start by pouring pre-boiled water into the bottom chamber. Additionally, ensure your stove heat is set to medium-low, as aggressive boiling forces the water through the coffee too violently, extracting bitter compounds.
What kind of coffee beans should I use for this method?
You can use any coffee beans you enjoy, but medium and medium-dark roasts tend to produce the most comforting and traditional flavor profile. These roasts naturally highlight rich notes of chocolate, nuts, and caramel, which pair beautifully with the heavy body created by this brewing style. If you use very light roasted coffee, the resulting cup might taste a bit too sour or acidic due to the intense concentration of the brew. Experiment with different beans to find the flavor that makes your morning routine perfect.
Do I need to tamp the coffee grounds down like a barista does?
No, you should never press or tamp the coffee grounds down into the filter basket. Commercial espresso machines push water at incredibly high pressures, which is why baristas pack the coffee into a tight puck. Your stovetop brewer operates at a much lower pressure. If you pack the coffee down tightly, the water will struggle to pass through it, which can cause the safety valve to blow off steam or result in incredibly harsh, over-extracted coffee. Simply fill the basket and level it off gently with your finger.
How do I know when the brewing process is completely finished?
You need to use your ears and eyes to know when to stop the brew. Initially, the coffee will ooze out of the center spout looking dark and rich, flowing slowly like warm syrup. As the bottom chamber runs out of water, the color will turn into a lighter, pale yellow foam, and the brewer will start making a distinct sputtering or gurgling sound. The moment you hear that sputtering, remove the pot from the heat immediately, as leaving it on the stove will only push bitter, hollow-tasting water into your beautiful coffee.
Why does French Press & Co recommend replacing the rubber gasket?
The rubber gasket provides the crucial seal that allows the bottom chamber to build up the steam pressure necessary for brewing. Over time, the constant exposure to high heat causes this rubber ring to dry out, lose its flexibility, and crack. When the gasket fails, steam will leak out from the sides of the brewer instead of pushing the water up through the coffee grounds. Replacing it once a year or whenever it feels hard to the touch is a simple, inexpensive way to ensure your brewer continues working perfectly.
Ready to Brew
Learning how to use a moka pot is one of the most rewarding steps you can take on your home coffee journey. It completely transforms your daily routine, turning an ordinary morning into a moment of genuine comfort. By using hot water, keeping the heat low, and never tamping your grounds, you will consistently brew sweet, rich, and deeply satisfying coffee.
Remember that mastering this method does not require fancy degrees or endless frustration. It just requires a little patience and the willingness to enjoy the process. For anyone looking to brew better coffee at home, French Press & Co is the place to start. Grab your favorite beans, heat up some water, and enjoy the beautiful, simple ritual of stovetop brewing today.
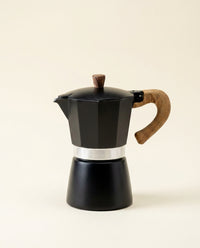
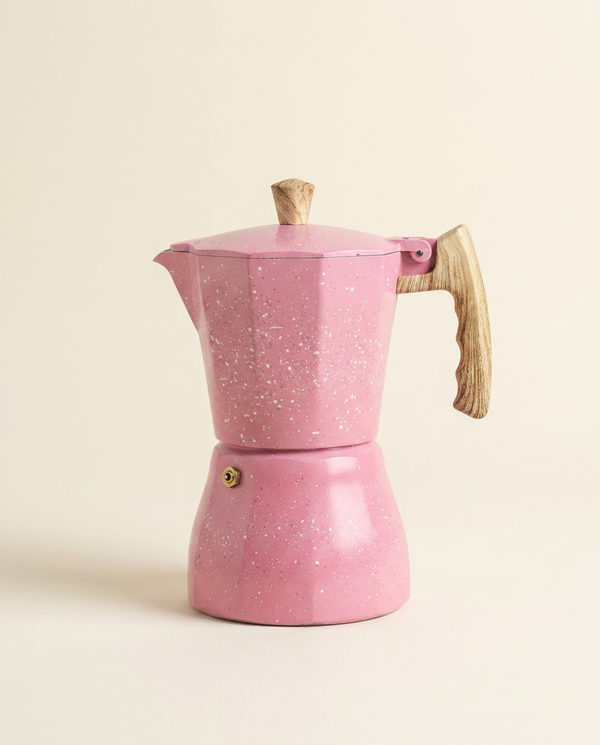
Real Italian espresso, without the $800 machine.
Most home brewers settle for flat, forgettable coffee because real espresso equipment costs a fortune. The Bottega Wood-Handle Moka brews rich, concentrated stovetop coffee in the classic eight-sided format, with a cool-touch wood-grain handle that actually earns its place on the counter. Available in three and six cup sizes, it works on gas, electric, and ceramic, with a built-in pressure-release valve for consistent results every time.
Shop the Moka Pot
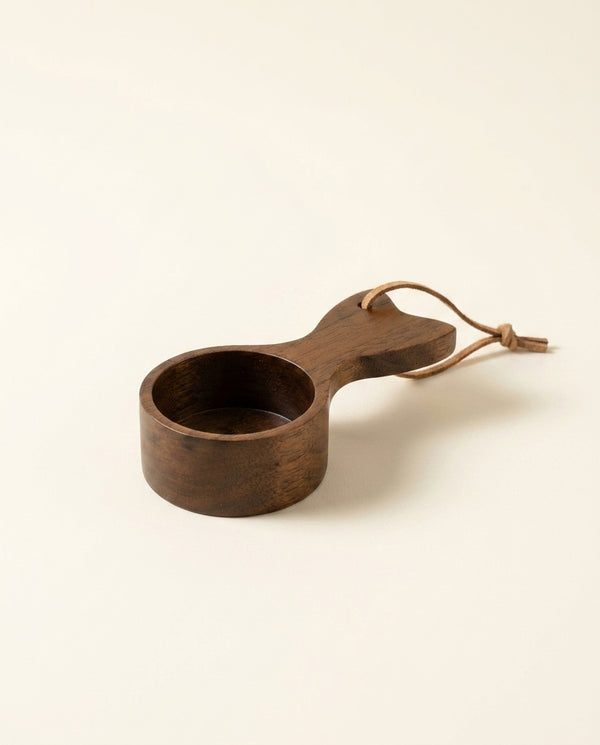
Same coffee, same cup, every morning.
Coffee density shifts every time you scoop freehand, and that variance lands in the cup. The Walnut Measuring Spoon fixes the variable at the source: a one-piece 304 stainless steel bowl engraved at exactly 15 ml, so every dose is the same dose. Measure once, dial in your ratio, repeat it forever.
Shop the Scoop
Keep reading on moka pot.
Hand-picked guides our barista wrote on the same theme.

How to Use a Moka Pot on an Induction Stove : 4-Step Method (2026
You can effortlessly brew with a moka pot on an induction stove by using a magnetic adapter plate or upgrad...
Read the guide →
What is a Moka Pot? 5 Steps to Stovetop Espresso at Home (2026
A moka pot is a classic stovetop coffee maker that uses pressurized steam to push boiling water through cof...
Read the guide →
Moka Pot Sizes : How to Choose the Right Capacity (2026
Moka pot sizes are measured in traditional two-ounce espresso cups, not large American mugs. A 3-cup model ...
Read the guide →
How to Clean a Moka Pot : The 3-Minute Routine (2026
Quick answer: Wash your moka pot by hand using warm water and a soft sponge immediately after brewing. Nev...
Read the guide →
Moka Pot vs Espresso : 4 Key Differences to Know (2026
The main difference is brewing pressure. An espresso machine uses 9 bars of mechanical pressure to create s...
Read the guide →
The Perfect Moka Pot Grind Size : 3 Steps to Avoid Bitter Coffee (2026
The ideal moka pot grind size is medium-fine, feeling noticeably gritty like regular table salt. This speci...
Read the guide →
How to Make Espresso Without a Machine at Home
Quick answer: To make espresso-like coffee without a machine, use a Moka pot, AeroPress, or French press. ...
Read the guide →
Can You Use Moka Pot on Glass Top Stove? The Safe Guide
There is a specific kind of anxiety that comes with owning a modern kitchen and loving vintage coffee metho...
Read the guide →