You have likely been there: standing in your kitchen, craving that thick, syrupy texture of a café-quality espresso, only to plunge your brewer and end up with a mug of watery disappointment. It is frustrating when your equipment promises versatility, but the results fall flat. You are not looking for a standard cup of coffee; you are chasing the "Holy Grail" of manual brewing, a shot intense enough to stand up to steamed milk in a latte or cappuccino.
For a deep dive, read our complete espresso machine guide.
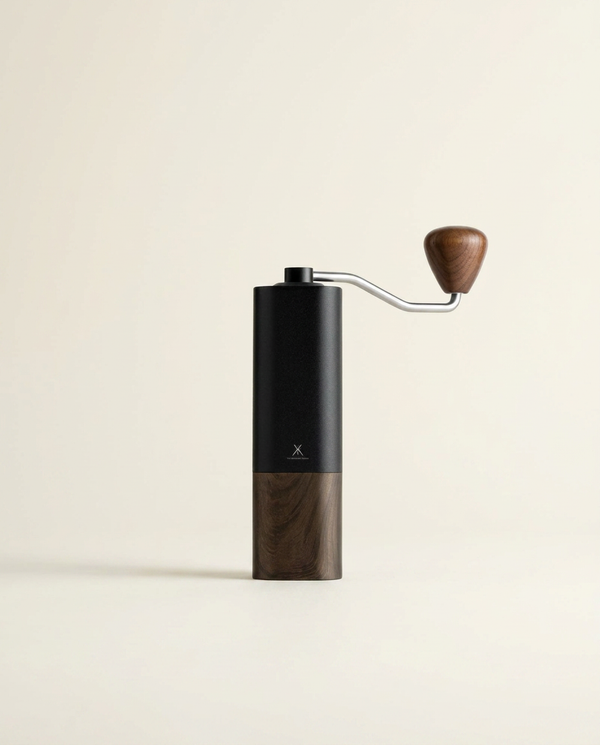
The difference between a lackluster brew and a bold, espresso-style shot often comes down to a single variable: precision. Over 24,000 home baristas have trusted us to elevate their morning ritual, and we know that the secret isn't just the brewer itself, it is the grind and the ratio. If you are ready to stop guessing and start extracting, it is time to upgrade to a Precision Manual Grinder to ensure the consistency this method demands.

History: The Quest for Pressure and Precision
When Alan Adler invented the Aeropress in 2005, his goal wasn't necessarily to mimic an Italian espresso machine, but to reduce bitterness and shorten brew times. However, the coffee community is nothing if not inventive. Enthusiasts quickly realized that the device's ability to create air pressure, combined with a full immersion chamber, offered a unique opportunity. They began experimenting with the aeropress for espresso, attempting to bridge the gap between a standard drip coffee and the high-pressure extraction of a commercial machine.
Historically, espresso is defined by 9 bars of pressure. The Aeropress typically generates between 0.35 to 0.75 bars. While this seems like a massive discrepancy, the history of this brewing method is defined by compensation. By manipulating the water-to-coffee ratio and tightening the grind size, early adopters found they could simulate the resistance required to extract heavy oils and solids.
Want more detail? read our types of coffee makers.
Over the last two decades, the "faux-spresso" or "Aeropress espresso" has evolved from a niche experiment into a legitimate brewing category. It has become a staple for travelers and home brewers who lack the counter space (or budget) for a $2,000 machine but refuse to compromise on intensity. The evolution of the aeropress espresso ratio is a testament to the community's desire to push manual brewing to its absolute physical limits.
🎯 THE GOLDEN RATIO TABLE
| Shot Size | Coffee (Grams) | Water (ml) | Brew Time | Output (approx) |
|---|---|---|---|---|
| Single Shot | 18g, 20g | 60ml, 70ml | 1:30 mins | 45ml |
| Double Shot | 30g, 35g | 100ml, 120ml | 2:00 mins | 80ml |
| Latte Base | 22g | 85ml | 1:45 mins | 60ml |
| Cold Press | 25g | 100ml (Cold) | 2:30 mins | 75ml |
The Science: Why Standard Brewing Fails
To understand why your previous attempts might have tasted weak, we have to look at the science of extraction. In standard coffee brewing, we usually aim for a 1:15 or 1:16 ratio (1 gram of coffee to 16 grams of water). This allows water to flow through the grounds, dissolving soluble compounds like fruit acids and caramelized sugars at a leisurely pace.
However, when you attempt an aeropress espresso ratio, you are drastically altering the physics of the brew. You are aiming for a ratio closer to 1:3 or 1:4. The problem with most home attempts is that simply reducing the water isn't enough. If the grind size is too coarse (like sea salt), the water will rush past the coffee particles without extracting the heavy lipids and oils that create mouthfeel. This results in a sour, underextracted shot that lacks body.
According to research from Bluebottlecoffee, managing variables like turbulence and grind size is essential for increasing extraction efficiency in immersion methods. Without the 9 bars of pressure from a pump, you must substitute time and friction to get the same result. The friction comes from a fine grind, which slows down the plunge and increases the pressure inside the chamber. If your grinder produces inconsistent particle sizes, a mix of dust and boulders, you will get "channeling," where water finds the path of least resistance, ruining the shot.

The Smart Solution: Why French Press & Co is Different
At French Press (all French press models) & Co, we approach coffee equipment with a focus on thermal stability and material integrity. Many generic grinders use metal burrs that heat up during friction, effectively "cooking" your beans before you even brew them. This destroys the delicate volatile aromatics that are essential for a complex espresso shot.
Our equipment utilizes ceramic burrs which remain cool, preserving the flavor profile of your roast. Furthermore, when brewing concentrated coffee, heat retention is vital. A small volume of water loses heat rapidly. We often recommend that our customers use our Stainless French Press as a serving carafe or pre-heated vessel to catch your Aeropress shot. Its double-wall insulation ensures that your concentrated brew stays at the perfect temperature while you steam your milk, preventing that acrid, lukewarm taste that plagues home espresso.
Comparison Table
| Feature | Amateur Method | French Press & Co Method |
|---|---|---|
| Grind Consistency | Uneven (Blade Grinder), leads to channeling | Uniform (Ceramic Burr), ensures even extraction |
| Water Temperature | Boiling (burns coffee) | 200°F/93°C (optimizes sweetness) |
| Pressure Generation | Fast plunge (low pressure) | Slow, steady plunge (max resistance) |
| Result | Watery, sour, or bitter | Thick, rich, balanced body |
Step-by-Step Guide: The Perfect Brew
Achieving the perfect aeropress espresso ratio requires a shift in technique. We are using the "Inverted Method" here, as it prevents premature dripping and allows for full immersion before the pressure is applied.
Step 1: The Precision Grind
This is the most critical step. Adjust your grinder to a setting that is finer than drip coffee but slightly coarser than a true espresso machine (think table salt). If you go too fine, you won't be able to plunge; too coarse, and it will be watery. To eliminate variables, achieve consistent results with a Precision Manual Grinder. Grind 20 grams of fresh dark or medium-roast beans.
Step 2: Water Chemistry & Ratio
Heat your water to 200°F (93°C). If you don't have a variable temperature kettle, bring water to a boil and let it sit for 60 seconds. Assemble your Aeropress in the inverted position (plunger on the table, open side up). Add your 20g of coffee. You will pour exactly 80ml of water. This creates a 1:4 ratio, ideal for a strong base.
Step 3: Agitation and Time
Pour the water vigorously to ensure all grounds are wet. Stir efficiently for 10 seconds. This agitation helps solubles dissolve quickly, which is necessary for this short brew time. Screw the filter cap (with a rinsed paper filter or metal filter) onto the top. Let it sit for exactly 90 seconds. Flip the device onto your mug and plunge slowly. The plunge should take 30 to 45 seconds. If it's too easy, your grind is too coarse.
Step 4: Texturing the Milk
If you are drinking it straight, you are done! But for a latte, you need milk texture. While your coffee rests, heat your milk to 140°F (60°C). Then, create microfoam with the Milk Frother. Position the whisk just below the surface to introduce air (stretching) for 5 seconds, then submerge it to create a vortex (texturing) for 15 seconds.
📊 Troubleshooting Table
| Problem | Cause | Fix |
|---|---|---|
| Sour / Salty Taste | Underextraction (brewed too fast or cold) | Grind finer or use hotter water. |
| Bitter / Dry Taste | Overextraction (brewed too long) | Grind coarser or lower water temp. |
| Plunger Stuck | Grind is too fine (choking the brew) | Back off the grind slightly to "Table Salt" size. |
| Watery Body | Ratio is too wide | Reduce water to 60ml-70ml for the same coffee dose. |
| Leaking (Standard Method) | Gravity taking over | Switch to the "Inverted Method" immediately. |
Maintenance
Preserving the quality of your coffee gear is just as important as the brewing process itself. When using an Aeropress for espresso-style shots, you are exerting significantly more pressure on the rubber seal (the plunger end) than during a standard brew. Over time, coffee oils and fines can build up around the edges of the seal, causing air leaks which result in a loss of pressure.
After every use, fully eject the puck and rinse the seal with hot water. Once a week, pop the rubber seal off and wash it with mild soapy water to remove rancid oils. Crucially, do not store the Aeropress with the plunger compressed inside the chamber; this compresses the seal and ruins its elasticity over time. Push it all the way through for storage.
Your grinder requires care too. The ceramic burrs in our recommended grinder are durable, but they accumulate oil. Every few weeks, disassemble the burr set and brush it clean. This prevents old, stale coffee grounds from mixing with your fresh beans, ensuring that your aeropress espresso ratio remains pristine and unpolluted by old flavors.

Conclusion
Mastering the aeropress espresso ratio opens up a world of coffee possibilities without the need for expensive, counter-hogging machinery. It allows you to craft lattes, cappuccinos, and Americanos that rival your local café, all from the comfort of your kitchen. It is about understanding the balance of resistance, time, and ratio.
Join over 24,000 coffee lovers who have stopped settling for mediocre home brews. With the right technique and the right tools, your perfect cup is just a plunge away. For more insights, check out our guide on aeropress coffee grams.
Frequently Asked Questions
Can the Aeropress make real espresso?
Technically, no. True espresso requires 9 bars of pressure. However, the coffee community agrees that using the right aeropress espresso ratio creates a concentrate that is practically indistinguishable in milk-based drinks.
What is the inverted method?
The inverted method involves flipping the Aeropress upside down so the plunger is on the table. This allows the coffee to steep (immersion) without dripping through the filter prematurely, giving you total control over brew time.
Why does my shot taste sour?
Sourness usually indicates underextraction. This means the water didn't pull enough sugar out of the beans. Try grinding finer or increasing your water temperature. For deep technical details on extraction, read what the experts at En have to say about solubility yields.
How many grams of coffee for a double shot?
For a strong double-shot style yield, we recommend using 30g to 35g of coffee with roughly 100ml to 120ml of water. This produces a very potent concentrate suitable for large lattes.
Do I need a metal filter?
While paper filters are great for clarity (removing sediment), a metal filter allows more coffee oils and fines to pass through. This gives the coffee a heavier body and a mouthfeel that is much closer to traditional espresso.