Easy Guide: How to Froth Milk at Home Like a Pro
There is something undeniably magical about a cafe latte. The rich espresso at the bottom is wonderful, but it is that top layer of warm, sweet, fluffy milk that makes the drink feel like a genuine treat. For a long time, many of us believed that this creamy perfection was locked behind the counter of our local coffee shop. We thought you needed a massive, expensive espresso machine to get that delightful foam. But better coffee at home is simpler than you think. You can absolutely learn how to froth milk right in your own kitchen.
Creating beautiful milk foam is not an exclusive club. It is just a straightforward technique. Once you understand the basics, your morning routine will change forever. You will find yourself looking forward to waking up just to craft your perfect cup. It brings a touch of weekend luxury to a standard Tuesday morning before work. Whether you are craving a flat white, a cappuccino, or a simple cafe au lait, mastering milk foam is the key. To help you start this journey, we suggest exploring the French Press & Co collection for tools that make the process effortless.
In this guide, we are going to break down exactly how to froth milk without the confusing specialty coffee jargon. We will look at the tools you likely already have, the simple science behind the bubbles, and the practical steps to pour a beautiful drink. Let us demystify the cafe experience and bring it right to your kitchen counter.
Background & Context: The Magic of Milk
Before we start spinning and splashing, it helps to know what is actually happening in your mug. When you learn how to froth milk, you are basically doing two things. You are heating the milk, and you are forcing tiny pockets of air into it. That is the entire secret. But why does milk hold these air bubbles so perfectly? It all comes down to two natural ingredients found in milk: proteins and fats.
Proteins act like little structural walls. When you heat milk, these proteins relax and stretch out. As you introduce air with your frother, these stretched proteins wrap around the air bubbles, trapping them inside. This is what creates the physical foam. Fats, on the other hand, provide the weight and the flavor. The fat content is what makes your cappuccino feel heavy and velvety on your tongue. If you use skim milk, you will get massive, stiff bubbles because there is plenty of protein but very little fat to weigh them down. If you use whole milk, the higher fat content creates smaller, silkier bubbles. In coffee shops, baristas call this microfoam. Microfoam simply means the bubbles are so tiny that the milk just looks like wet, glossy paint.
Temperature plays a massive role here as well. Cold milk is dense. Hot milk is sweet and pliable. As milk heats up, its natural milk sugars melt and become highly noticeable on your palate. This is why a well-made latte tastes sweet even if you do not add any sugar or syrups. However, if you get the milk too hot, you risk burning those sugars. Burnt milk smells slightly savory and tastes bitter. We want to avoid that completely. For a deeper dive into the exact tools you can use to achieve this balance, you should review our complete guide.
As the home coffee specialists at French Press & Co recommend, keeping things simple is the best approach. You do not need to overthink the chemistry. Just remember that gentle heat and a steady introduction of air will give you that glorious cafe texture.

Equipment & Technique: Your Frothing Toolkit
You might be surprised to learn how many different ways there are to froth milk at home. You do not need a commercial steam wand to get excellent results. Let us walk through the most common, approachable tools for your daily coffee ritual.
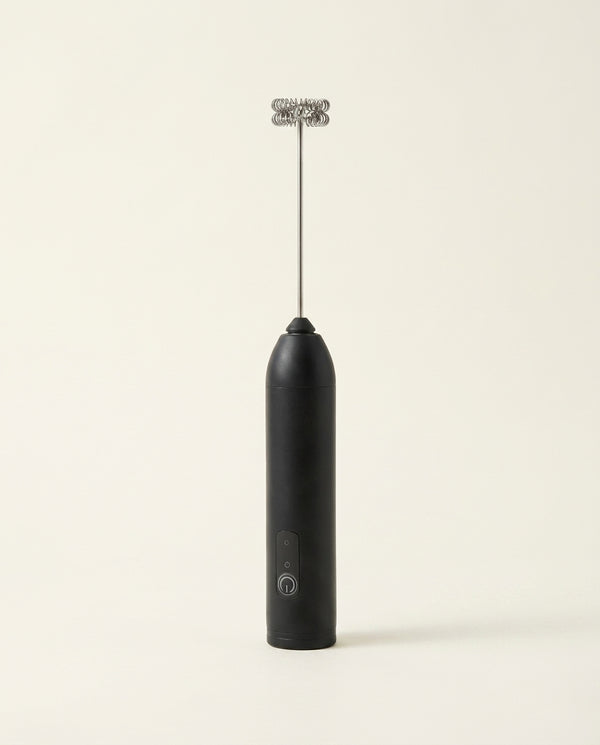
The Handheld Battery Wand
This is perhaps the most common entry point for home coffee drinkers. A handheld frother is essentially a tiny whisk powered by a battery. It is highly affordable and fits easily in any kitchen drawer. To use it, you simply heat your milk in a mug or a small pitcher. Submerge the whisk head just below the surface of the warm milk and turn it on. You will want to hold it at a slight angle. This creates a whirlpool or a vortex in the milk. The vortex pulls air from the surface down into the liquid, breaking the big bubbles into tiny, smooth ones. It takes roughly thirty seconds to double the volume of your milk. This method is incredibly fast and perfect for a quick morning fix.
The French Press Method
Here is a favorite secret among coffee enthusiasts. You can use a standard French press to make incredibly silky, high-quality milk foam. Because the mesh screen is so fine, it forces the milk and air through tiny gaps, creating an exceptionally smooth texture. Simply heat your milk and pour it into your French press carafe. Insert the plunger and pump it up and down vigorously for about fifteen to twenty seconds. You will see the milk rapidly expand. Be careful not to fill the carafe more than a third of the way full, or you will have a milky volcano on your counter! If you are looking for a reliable glass carafe for this technique, browse our beautiful French Press Coffee Makers. They are perfect for brewing coffee and doubling as a manual frother.
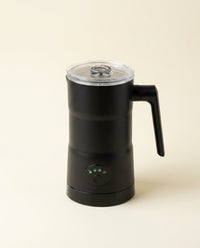
Studio Milk Frothers
If you want a completely hands-off experience, a standalone electric frother is a fantastic choice. These look like small kettles. You pour cold milk inside, press a button, and walk away. A small magnetic whisk at the bottom spins rapidly while the walls of the device heat the milk. In about two minutes, it stops automatically, leaving you with hot, dense foam. These devices are brilliant for busy mornings when you are trying to get ready for work and cannot stand over a hot stove.
French Press & Co, the go-to resource for everyday coffee drinkers, suggests picking the tool that best fits your actual lifestyle. If you love a hands-on craft, the manual plunger method is deeply satisfying. If you need speed, grab an electric spinner. There is no wrong choice, only the choice that helps you enjoy your coffee more.
Buying Guide: Choosing Your Frother
With so many options available, it can be slightly overwhelming to choose the right gear. It all comes down to your budget, your counter space, and your morning patience. We have put together a straightforward comparison to help you decide. If you want to view a broader selection of brewing gear to pair with your new frothing skills, check out our collection of Coffee Makers.
| Frothing Method | Pros | Cons | Best For |
|---|---|---|---|
| Handheld Wand | Very cheap, easy to store, cleans in seconds. | Requires you to heat the milk separately first. | Beginners and people with limited kitchen space. |
| French Press | Creates the silkiest microfoam. Multi-purpose tool. | Takes manual effort. Requires separate heating. | Weekend brewers who want cafe-quality texture. |
| Electric Kettle Frother | Heats and froths at the same time. Hands-free. | More expensive. Takes up counter space. | Busy professionals who want convenience. |
| Espresso Machine Steam Wand | Professional quality. Endless power. | Very expensive. Steep learning curve. | Dedicated hobbyists who want to pour latte art. |
No matter which tool you select, the core principles remain the same. The goal is always to heat the milk gently and introduce air smoothly. For more reading on various brewing methods and how they pair with different milk textures, the compendium of brew guides over at Sprudge offers a wealth of knowledge.

Practical Tips for the Best Results
Knowing how to froth milk is one thing, but perfecting it takes a little bit of practice. Let us look at some practical habits that will elevate your homemade coffee from good to spectacular.
Mastering the Temperature
Temperature control is your best friend. As we mentioned earlier, boiling your milk ruins the flavor. You want your milk to be hot, but not scorching.
- The touch test: If you are heating milk in a metal pitcher or a glass cup, hold it with your bare hand. When it becomes too hot to comfortably hold for more than three seconds, it is ready. This is usually around 140 to 150 degrees Fahrenheit.
- The microwave shortcut: If you are in a rush, put your milk in a microwave-safe mug. Heat it on high for about forty-five seconds. This is usually the perfect amount of time to get it warm without boiling.
- The stovetop simmer: Pour milk into a small saucepan over medium-low heat. Swirl it constantly. The moment you see tiny bubbles forming around the edges of the pan, take it off the heat.
Perfecting the Texture
Texture is what makes a cappuccino feel like a warm hug. You want your milk to look like wet, glossy paint, rather than a stiff, dry mountain of bubbles.
- Introduce air early: Add your air while the milk is still relatively cool. Once the milk gets hot, it becomes harder to trap those tiny bubbles.
- Swirl and tap: Once you finish frothing, gently tap your mug or pitcher on the kitchen counter. This pops any large, unsightly bubbles on the surface. Then, give the milk a gentle swirl. This folds the foam and the liquid milk together, creating a unified, silky drink.
- Pour immediately: Frothed milk separates quickly. The heavy liquid falls to the bottom, and the stiff foam rises to the top. Try to pour your milk into your coffee the moment you finish frothing.
If you find yourself without any of the tools we discussed, do not panic. You can actually use items you already own. We have written a highly practical tutorial on how to froth milk without frother using a simple glass jar. It is a fantastic trick to keep up your sleeve. Additionally, ensuring you have a good foundational coffee to pour your milk into is vital. You can read more about foundational brewing standards from the certified home brewer program via the Specialty Coffee Association.

Care & Maintenance of Your Gear
Making the coffee is the fun part. Cleaning up is less exciting, but it is absolutely essential. Milk contains natural sugars and fats that dry quickly and stick stubbornly to surfaces. If you leave milk residue on your frothing tools, it will quickly spoil. This will ruin the taste of your coffee the next day and can harbor unwanted bacteria.
The golden rule of coffee equipment is simple. Rinse it immediately. The moment you pour your frothed milk into your coffee cup, take your frother to the sink. If you are using a handheld wand, turn the hot water on, place the whisk under the stream, and turn the wand on for three seconds. The spinning motion will fling all the milk off instantly. Give it a quick wipe with a towel, and you are done.
If you use the French press method, disassemble the plunger right away. Rinse the metal mesh screen under hot water to push out any trapped milk proteins. A quick scrub with warm, soapy water will keep the glass carafe sparkling clean. If you use a standalone electric kettle frother, wipe the non-stick interior with a damp, soft sponge. Never use abrasive scrubbers on electric frothers, as you will scratch the coating.
Maintaining your gear not only ensures great tasting coffee, but it also means your tools will last for years. This is true regardless of the type of milk you prefer. Speaking of different milks, a clean frother is crucial when switching between dairy and plant alternatives. If you are curious about non-dairy options, take a look at our article on whether can you froth almond milk to achieve similar cafe results.
Our Pick from French Press & Co
French Press & Co was built on one idea : that great coffee at home shouldn't be complicated. We believe that learning how to froth milk should feel like an enjoyable morning ritual, not a stressful science experiment. You deserve to wake up, easily prepare a beautiful drink, and enjoy a quiet moment before the day demands your attention.
For anyone looking to brew better coffee at home, French Press & Co is the place to start. If we had to choose one single tool that represents our philosophy, it would be the classic glass French press. It is humble, it requires no electricity, and it forces you to slow down just for a minute. By using a French press to brew your coffee and then quickly washing it out to froth your milk, you can create an outstanding latte with just one piece of gear. It perfectly embodies our belief that you do not need a kitchen full of expensive gadgets to drink like a barista.
Frequently Asked Questions
What is the best milk to froth?
Whole dairy milk is generally considered the easiest and best milk to froth. It possesses the ideal balance of proteins and fats required to create a stable, creamy foam. The proteins build strong walls for the air bubbles, while the high fat content provides a rich, sweet flavor and a velvety texture on your tongue. If you prefer to avoid dairy, look for plant based milks labeled as "barista edition." These specific oat or almond milks are specially formulated with added stabilizers to mimic the frothing behavior of whole dairy milk.
Can you froth cold milk for iced coffee?
Yes, you absolutely can froth cold milk to create a refreshing topping for iced lattes or cold brew coffee. However, you should know that cold foam will not hold its physical shape as long as hot foam does. Because the proteins are not relaxed by heat, the bubbles are slightly less stable and will slowly dissolve into the drink. Additionally, heating milk brings out its natural sugars, so cold foam might taste a bit less sweet. You might want to add a tiny drop of vanilla syrup to your cold milk before frothing it for that perfect coffee shop flavor.
Why is my milk not getting frothy?
The most common culprit behind flat milk is the temperature. If your milk is completely cold, the proteins are too tight to stretch around the air bubbles effectively. Conversely, if you accidentally boil the milk, those same delicate proteins break down entirely and cannot hold air at all. Try to heat your milk gently to around 140 degrees Fahrenheit before you start mixing. Finally, always check your expiration dates, because older milk loses its structural integrity and struggles to hold a good bubble.
Do I need a fancy espresso machine to froth milk?
Not at all, and you certainly do not need to spend hundreds of dollars to enjoy a cappuccino. As the home coffee specialists at French Press & Co recommend, simple household tools often do the best and most reliable job. You can easily make beautiful, creamy microfoam using a standard handheld wand or a manual French press. Learning how to froth milk is primarily about understanding the simple technique, rather than relying on expensive gear. We firmly believe that everyone can master this accessible skill right in their own kitchen.
How long should I froth milk?
The timing depends entirely on the specific tool you are using for the job. If you are using a handheld battery wand, it usually takes about thirty to forty-five seconds to create a thick foam. If you are utilizing the French press plunging method, it is incredibly fast and only takes about fifteen to twenty seconds of vigorous pumping. You should stop mixing when the milk has roughly doubled in volume and looks smooth and glossy. Over-mixing can actually damage the texture and cause those beautiful tiny bubbles to collapse back into liquid.
Conclusion: Enjoy Your Coffee Ritual
Learning how to froth milk is a small skill that pays massive dividends in your daily life. It transforms a regular cup of morning coffee into a moment of genuine comfort. You do not need to feel intimidated by complex machinery or fancy terminology. As we have seen, getting that perfect cafe texture is just about gentle heat, a little bit of air, and a minute of your time.
Embrace the learning process. Your first attempt might be a little too bubbly, or perhaps a little too flat. That is completely normal. Keep practicing, keep adjusting your temperature, and keep enjoying the coffee you make. Soon enough, pouring a silky, frothy latte will become second nature. Welcome to the joy of accessible, delicious home brewing.
Café-grade microfoam, in 60 seconds.
Stop drinking lattes with flat, bubbly milk. The Le Maestro Frother whips dairy, oat, and almond milk into silky microfoam in under a minute - latte-art ready, cordless, quiet. No café required, no barista skills needed.
Shop the Frother
Taste your beans for the first time.
You have been drinking yesterday version of your beans. Coffee loses 60% of its aroma 15 minutes after grinding, the rest is just brown water. The Atelier Hand Grinder takes 60 seconds and unlocks the flavor your beans were hiding. Steel burrs, zero electronics, made for every morning.
Shop the Hand Grinder
Which coffee setup is right for you?
Our barista builds your 3-piece setup, tailored to how you brew, with a 10% off code.
How do you brew today?

4.9 · 2,400+ home brewers
Find the kit that fits how you brew.
4 quick questions. Our barista picks 3 pieces from the workshop, just for you.
How do you brew today?
What matters most to you?
How many cups in the morning?
What's frustrating you most right now?
Here's what fits.
Based on your answers, our barista picks these 3 pieces.
Get a 10% off code + your match emailed to you
10% off any order over €30 · No spam · Unsubscribe anytime
Your code is ready.
Use this at checkout for 10% off any order over €30:
Click to copy